Title here
Summary here
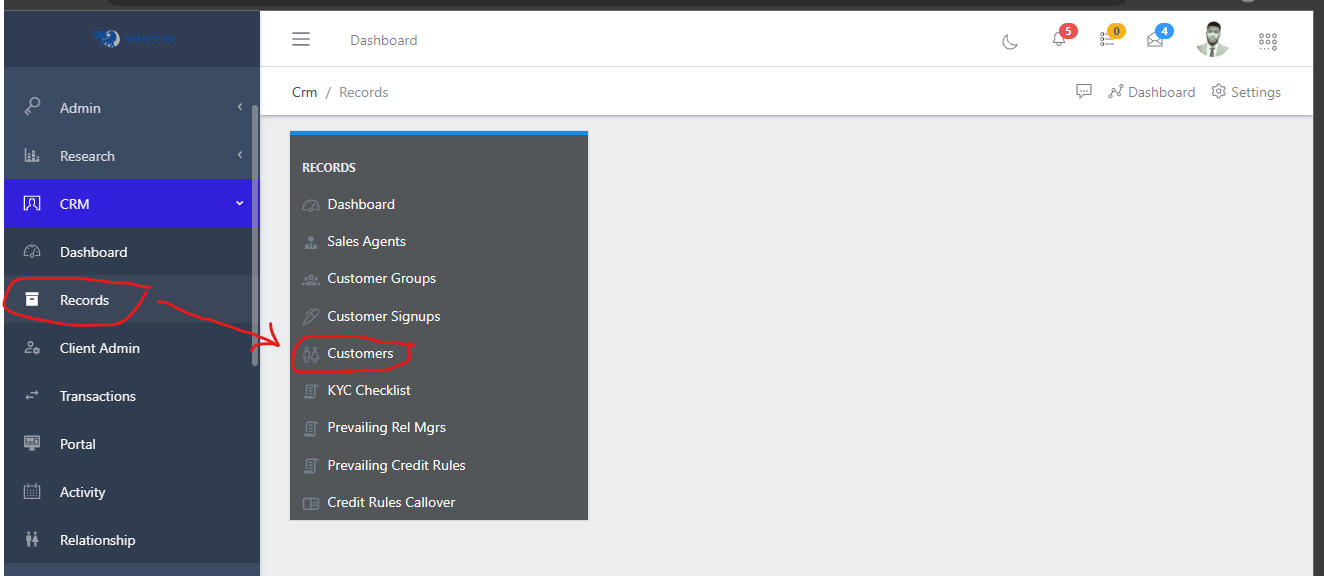
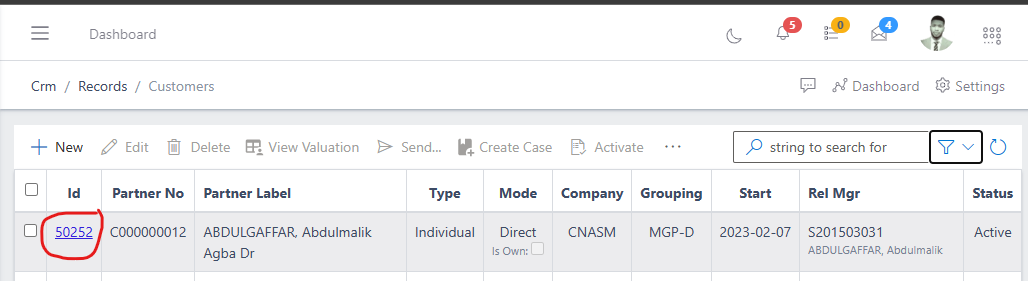
To navigate to the customer submodule, from the homepage of the ERP, on the side bar navigation locate the “CRM” module and click on it, you will see a list of drop down menus, select the “Records” sub menu in the dropdowm menus, you will have the records dashoard displayed with different sub modules, now select the “Customers” menu. see image below
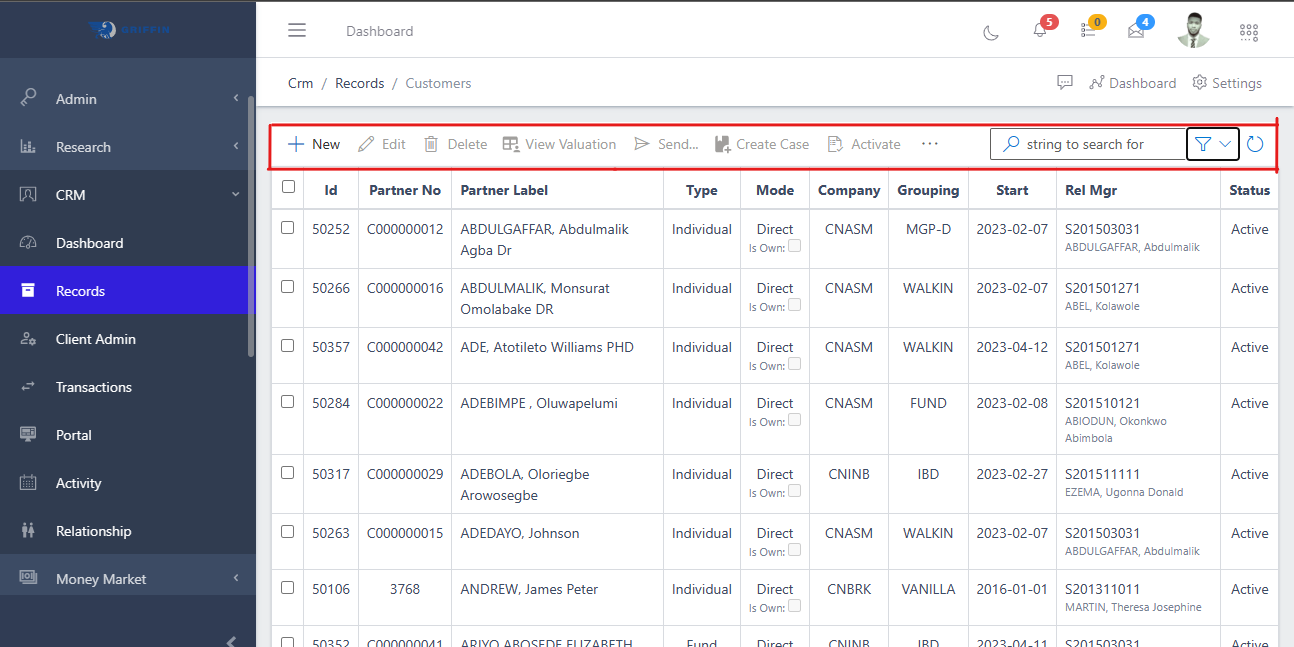
In the customers view you have a centralized list of all customers with a summarized information view. You also have a list of commands (highlighted in the image below) above the customer list that you can use to perform various actions on a particular customer or group of customers by selecting the checkbox on the left hand side of the customer’s ID.
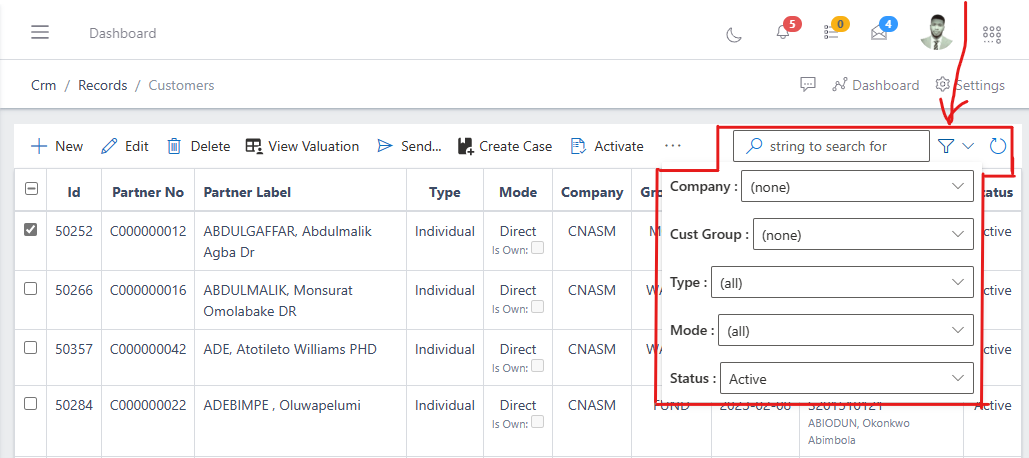
You can quickly search for a customer with thier names, ID or customer number using the search bar and you can also narrow down to specifity your search using the filter button (funnel icon) on the right side of the search bar. You can search for a customer and filter your search by the customer’s company, group, status, etc as shown in the image below.
Also, to view the total information of a customer, you click on the ID of the customer.
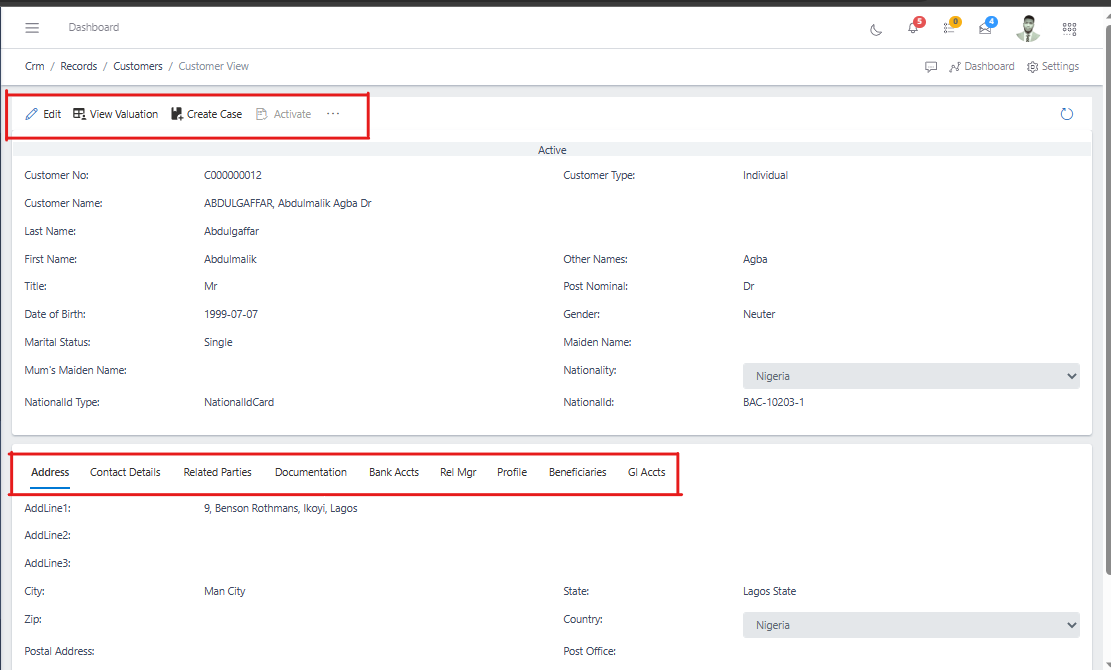
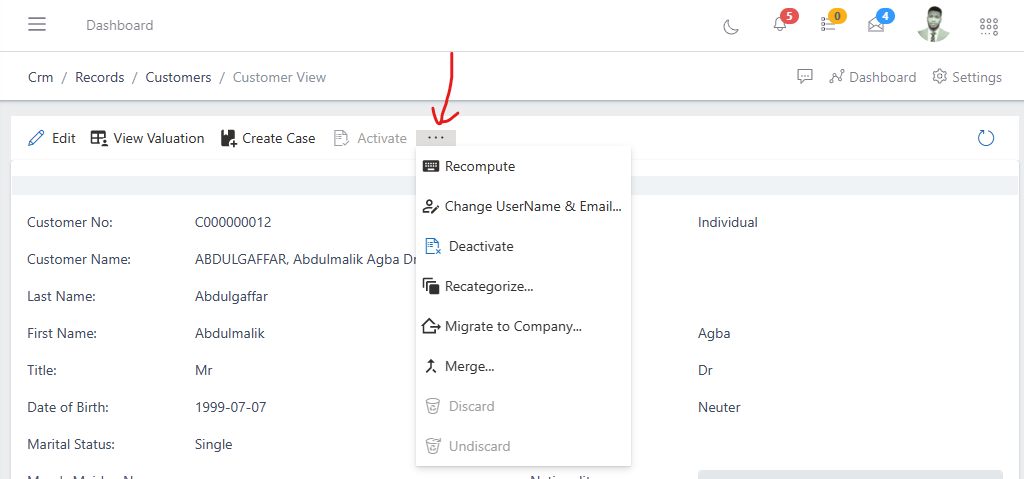
In the image above you will notice the commands above that was highlighted, you can either choose to edit the customer details, view the customer’s valuation or whatever the case may be. You will also notice the ellipsis (…) after the activate command, you can click on it to access more command options as shown below.
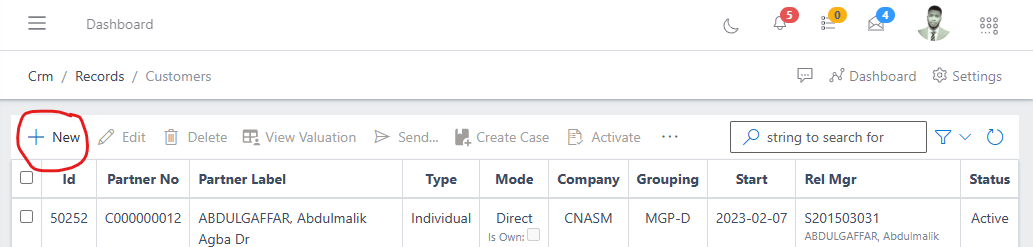
To onboard a new customer, follow the steps below:
Navigate to the customers section under the records sub-module of CRM module: see how to navigate in the section above.
In the customers section you will see the list of existing customers and a button named “new” at the top left corner where you have a list of commands. click on the “new” button.
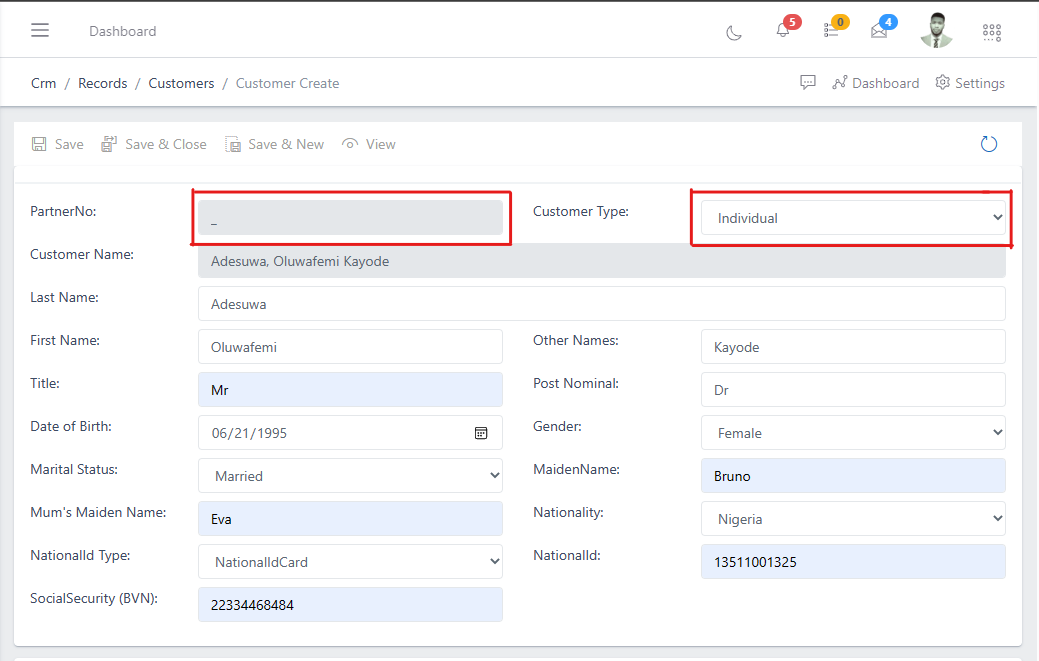
In the image above you will notice the “Partner no” field is greyed out, this field is also known as the Customer number, it will be automatically generated once the customer information is saved. And on the right you have the “customer type” drop down menu options, click on it to choose the type of customer you are onboarding, it could be an individual, Enterprise or Trust depending on whatever the case may be.
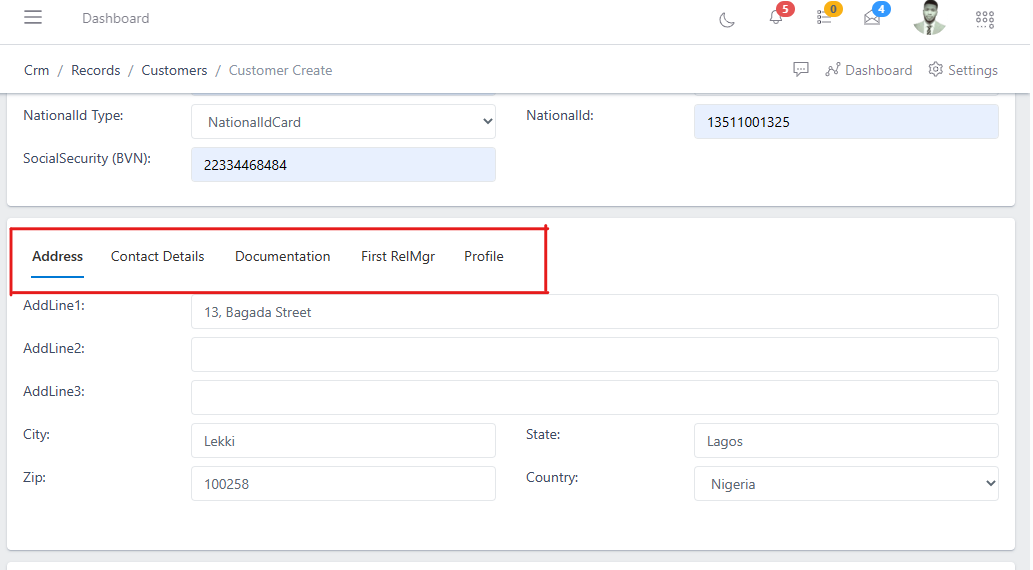
In the image below, still on the same page of the customer onboarding form, at the bottom you have a table of sections to fill in the address, contact details, Documentation, First RelMgr (Relationship manager) and profile information of the customer that is being onboarded. note: The necessary details in these fields must be filled.
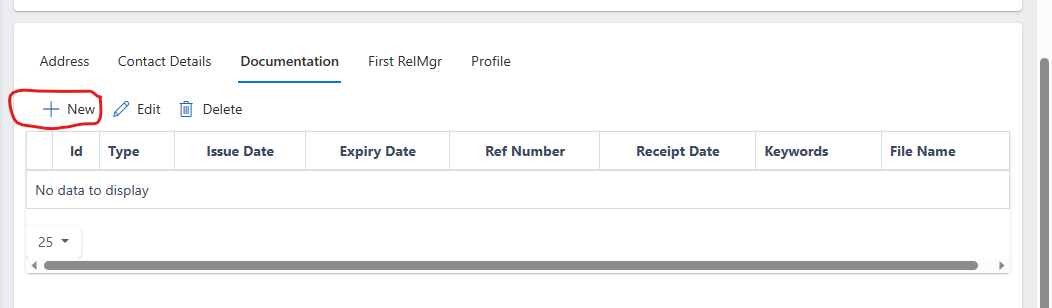
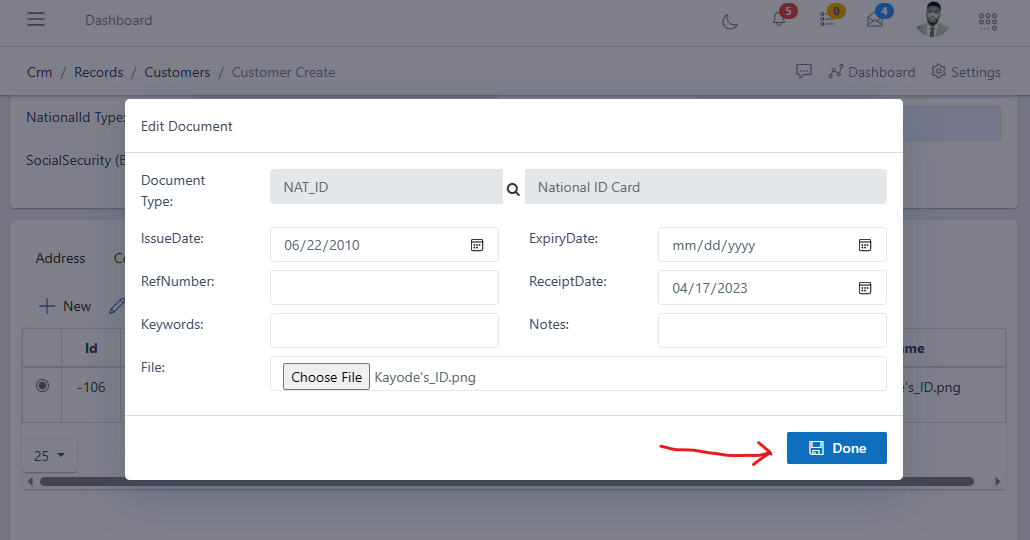
To do this, click on the new button under the documentation tab as shown in the image below
Select the document type and choose the softcopy of the document you want to upload from your computer, in the example below, the selected document type is a National ID card. Also fill in the issue date and expiry date of the selected document if applicable, click done to save.
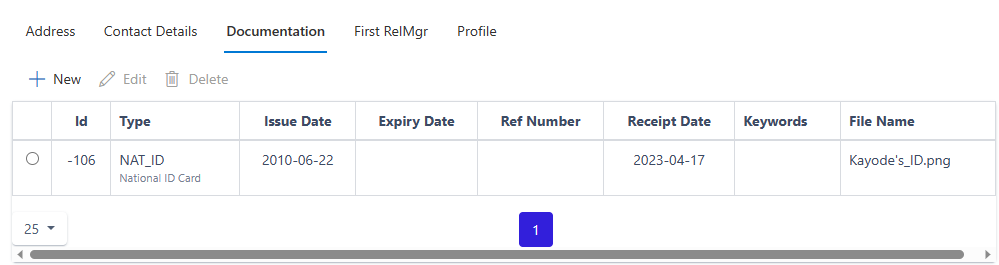
After successfully adding a document, you should see it as shown in the image below, you can add as many document as necessary.
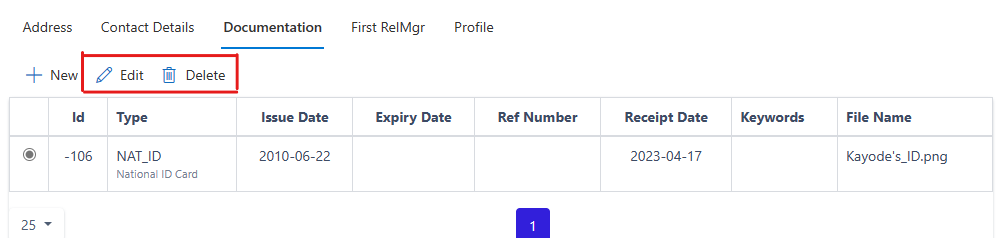
You can also edit or delete a document by first selecting the radio button on the left side of the document ID and then selecting the edit or delete button as the case may be, see image below:
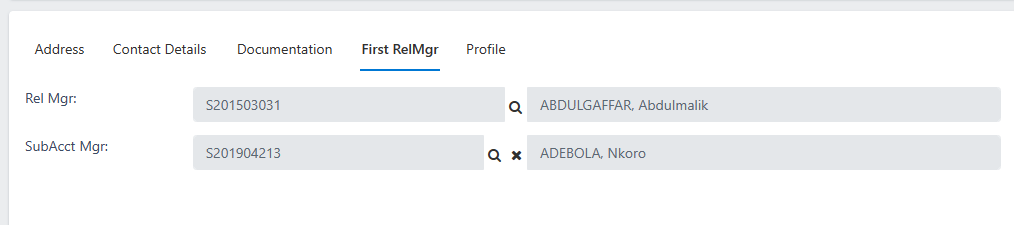
Add the relationship manager by selecting a staff of your organization who will serve as a relationship manager. You have two fields to select from, the Rel Manager (Relationship manager): who is the main relationship manager of the customer and the SubAcct Mgr (Sub account manager): who stands in place of the main relationship manager if unavailable. see image below
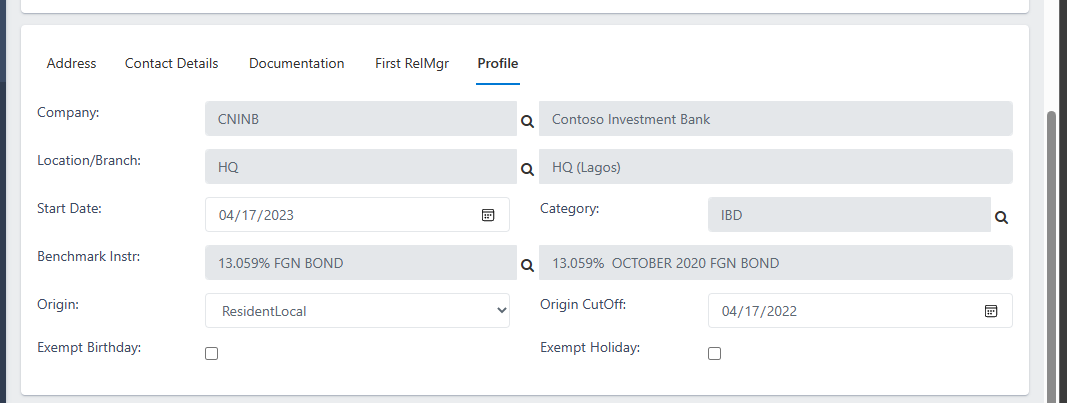
Add all the necessary customer profile information as shown in the image below
AFter filling all the necessary details completely, click on the save button to save the customer information.

If you notice the image above you will see “save”, “save & new” and “save & close” buttons.
When you use the “save” button, it saves the customer details only and leaves you in the customer details page.
When you use the “save & new” button, it saves the customer details and automatically takes you to a page to create another customer.
When you use the “save & close” button, it saves the customer details and automatically takes you to the customers view page (Where you have the list of customers in the ERP)

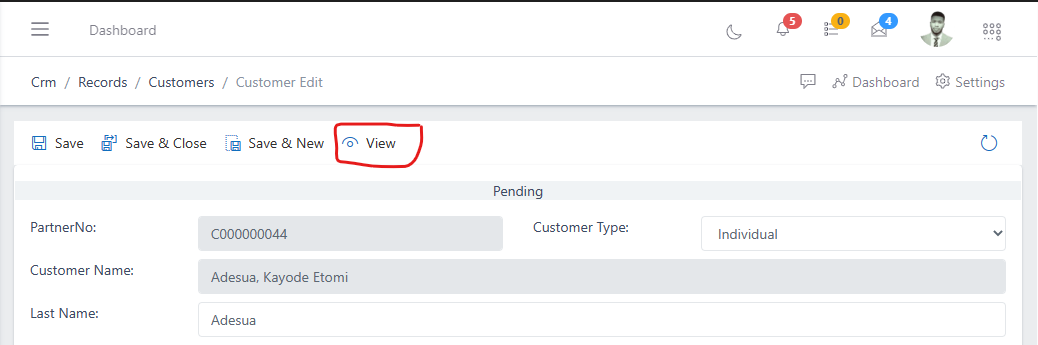
Whenever you save a customer information for the first time, they assume a pending status (see image above), this is to allow whoever is in the operations to go through the customer information and assertain that the customer’s details are fine before they go ahead to activate the customer.
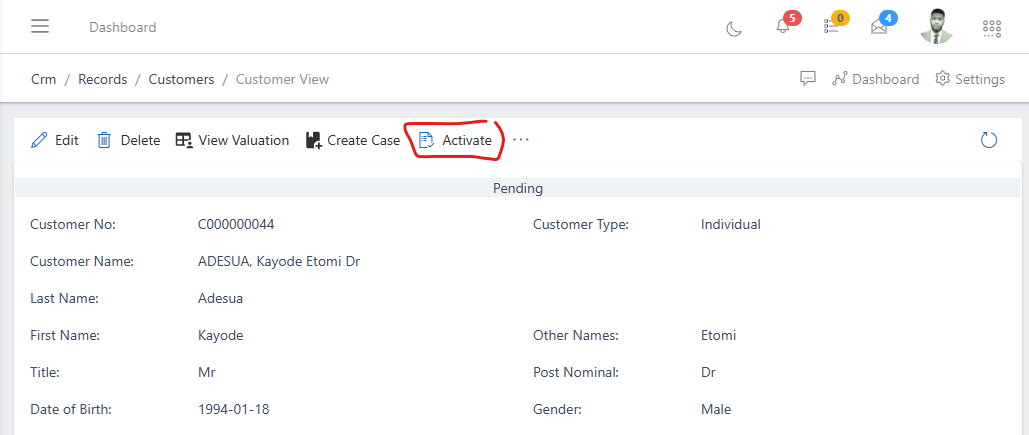
To activate the customer you can either click on the view button: where it takes you to the customer information view and then you click the activate button as show in the images below:

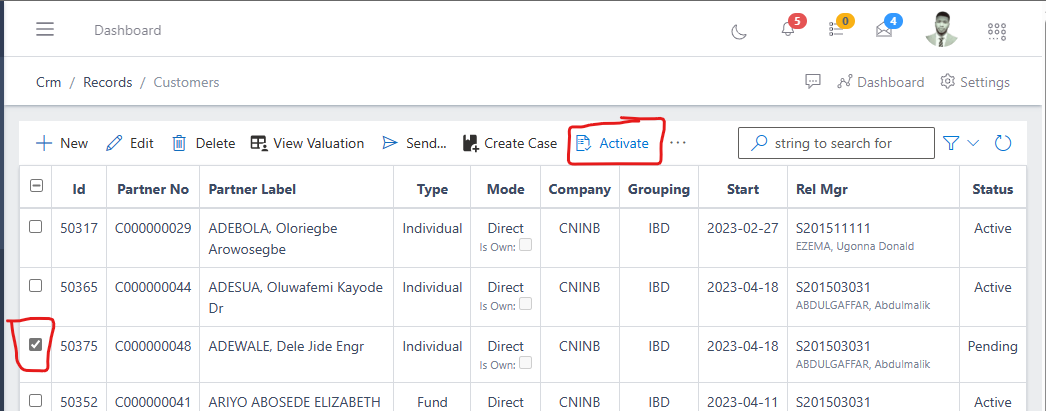
Alternatively you can also directly activate customers from the customers list view. if you see the image below you will notice the customer highlighted “Adewale Dele Jide, Engr.” from the customers list view currently has a status of “pending”
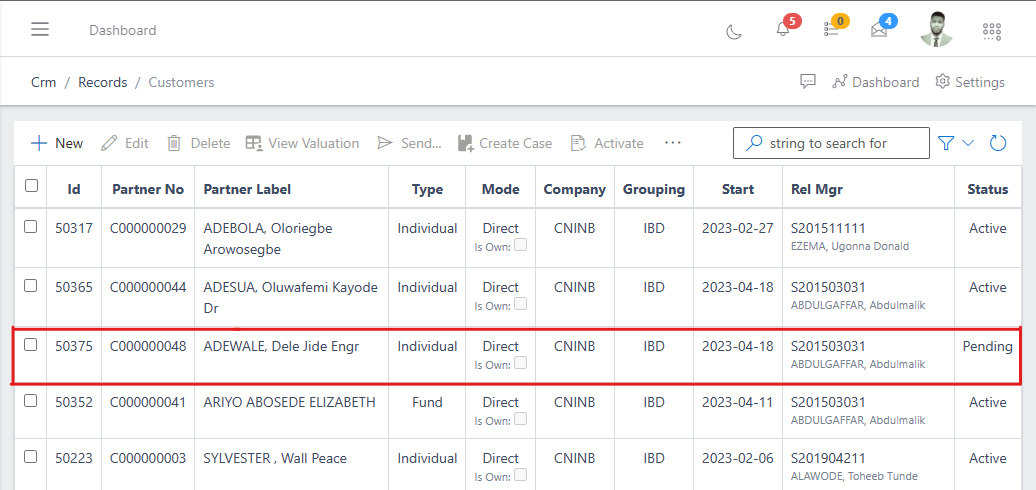
To activate from the customers list view you can simply select the customer you want to activate by clicking on the checkbox on the left side of the customer’s ID and then click on the activate button at the top of the customer’s list, see the images below:
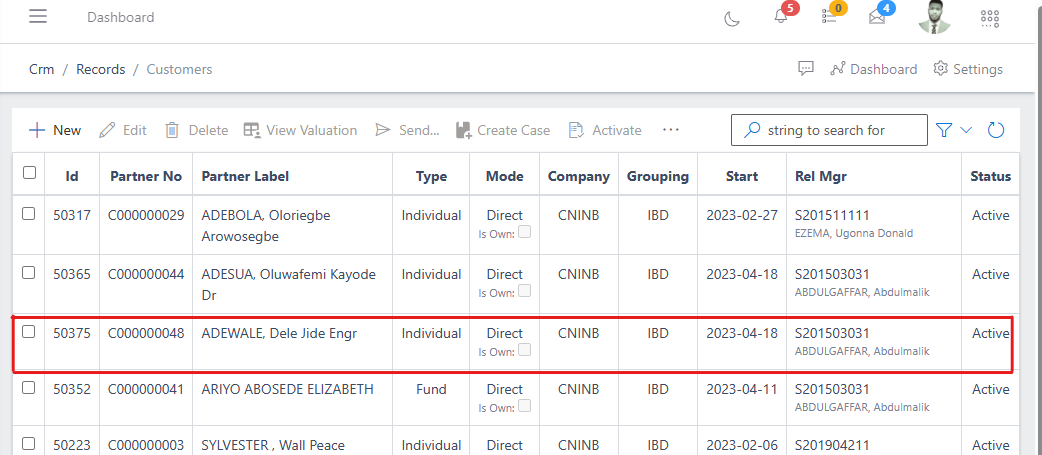
In the image above you will notice that the customer “Adewale Dele Jide, Engr.” is now active in the ERP and can now make transactions or subscribe to services across the system.
Note: If you would like to activate or deactivate multiple customers at the same time, this approach of activating from the customer’s list view is the preffered way as you are provided the option to select multiple customers at the same time by using the checkboxes.
Note: Once a customer is activated within the system, a financial account is automatically created for them in the Finance module of the application, there will be no need of re-entering the customer details in the Finance module for the sake of creating a customer financial account as every prior details needed is now available in the Finance module of the ERP.
The customer valuation is where you can have an holistic view of a customers portfolio or asset details. You can download, print or send this valuation as a softcopy or hardcopy to customers via email or other channels available within the application.
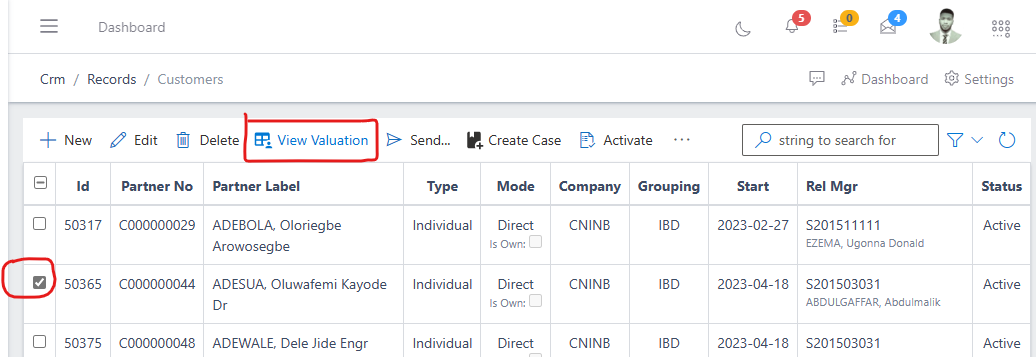
To view a customer valuation, simply go to the customer’s list view and select the customer by using the checkbox and clicking on the “view valuation” button at the top of the customer list, or you can simply click on the customer’s ID to enter the cutomer’s information full view and then click on the “view valuation” button, see images below:

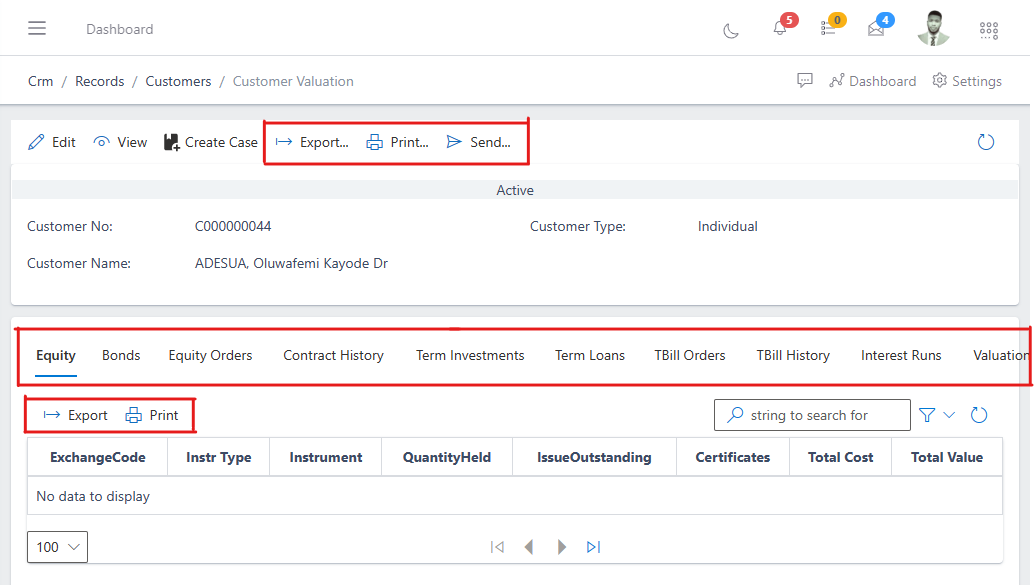
The image below show you a customers valuation. You will notice some highligted areas, the first highlighted shows you the operations you can perform on the customers valuation (either you want to export, print or send the valuation), the second highlighted shows different tabs having specific information about the customers assets/liabilities (Equity, bonds, term loans, etc) and also some tabs showing information for the customer orders, contract history, etc. you can switch between tabs by selecting them, currently from the image below we are on the Equity tab and you will notice there is no information there, this is because the customer has not subscribed to any equity.
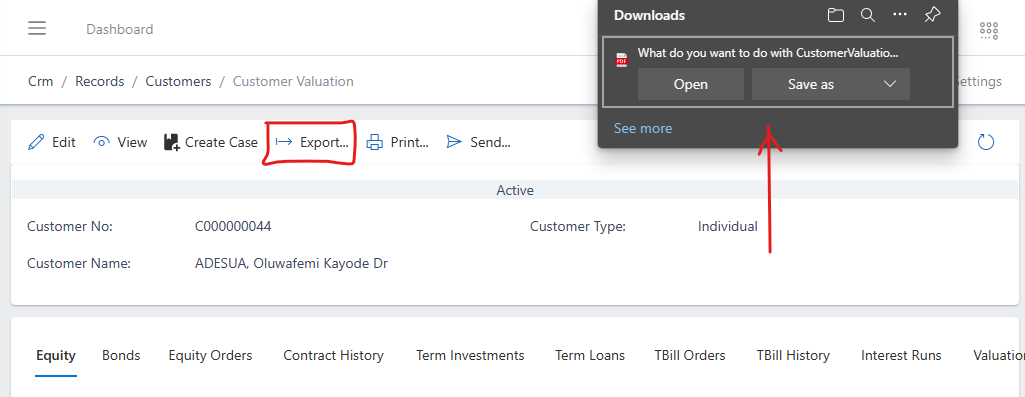
The third highlighted shows you the export and print buttons which you can use if you want to export or print the information of a specific asset, liablity, contract history or whatever the case may be.
Exporting a customers valuation simply downloads the customer valuation to your local computer as a pdf document, see image below
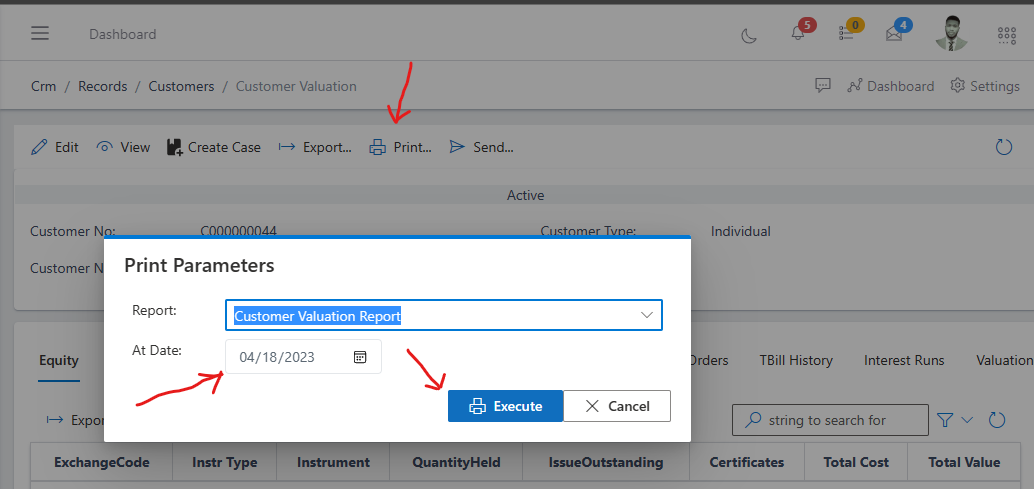
To print a customer valuation, simply click on the print button and then specify the date for which you want to print for and click the execute button.
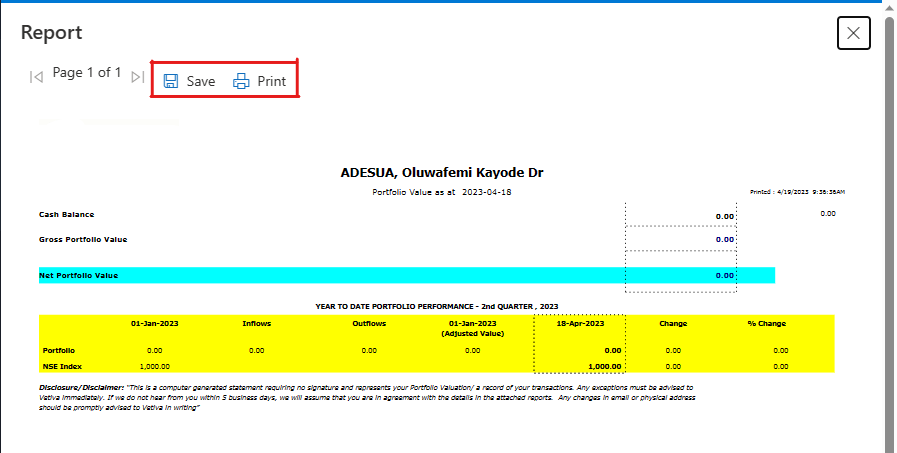
After clicking on the print button you will see a preview of the customer’s valuation report, you can choose to save the report as a pdf document or go ahead and print directly to a printer. see image below
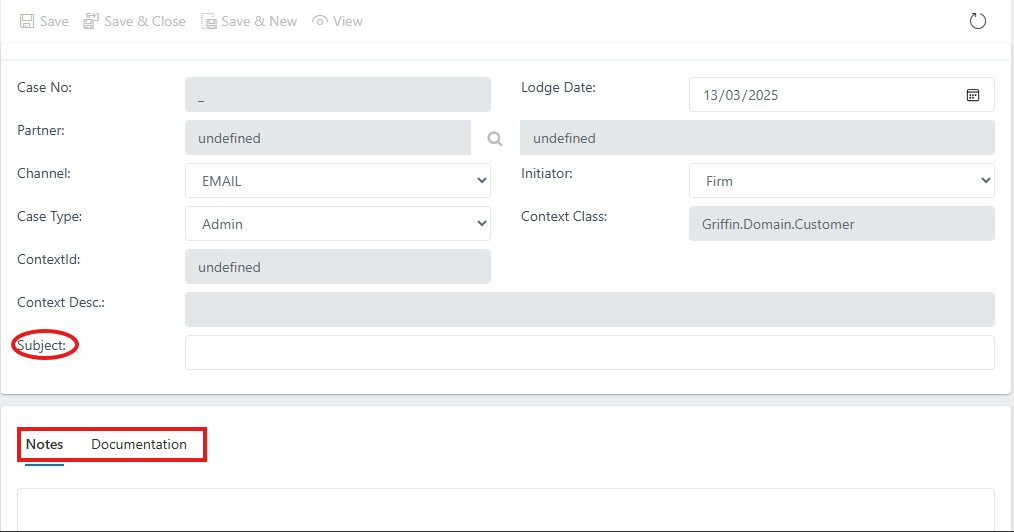
The Customer Create Case is where you can lodge a complaint, record and resolve customer issues, you can use cases.

After clicking on the “Create Case” button, you will be redirected to a page where you can complete the complaint form. You will be required to provide the subject of the complaint, a detailed description in the notes section, and upload any necessary supporting documents.